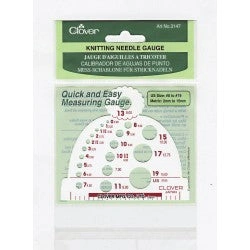
Clover Knitting Needle Gauge Measurement Tool Guide
Unveiling the Secrets of Knitting Needle Sizes: A Guide to the Clover Gauge
Knitting can be a deeply satisfying craft, but the multitude of needle sizes can sometimes feel overwhelming. Fear not, fellow knitters! This guide will help you master the art of measuring your knitting needles, ensuring perfect projects every time. We'll focus on the Clover Knitting Needle Gauge – your pocket-sized ally in the world of yarn.
Why a Gauge Matters
The correct needle size is critical for achieving the desired fabric density and drape. Using the wrong size can lead to projects that are either too loose and saggy or too tight and inflexible. The Clover gauge simplifies this process, letting you easily identify needle sizes, even on those well-loved, slightly worn needles.
Using the Clover Gauge: A Step-by-Step Guide
- Locate the Holes: The Clover gauge features a series of holes designed to accommodate various needle sizes.
- Insert Your Needle: Gently insert the needle into each hole until it fits snugly.
- Read the Size: The size is indicated by the number marked on the gauge next to the hole that best fits your needle. The Clover gauge covers US sizes 0-19, providing a wide range for your projects.
Beyond the Basics: Tips and Tricks
- Handle Worn Needles: The Clover gauge is particularly useful for identifying the sizes of old or worn needles where the size markings might have faded or been rubbed off.
- Check Both Ends: Ensure you check both ends of your double-pointed needles (DPNs) or circular needles, as the size might differ slightly.
- Keep it Handy: Store your Clover gauge with your knitting supplies for easy access.
By using the Clover gauge, you'll have more accurate needle measurements and better results in your knitting projects. Happy knitting!